Showing posts with label Appetizer. Show all posts

Artichokes

It took a long time before I understood the true value of the artichoke.  There are lots of "artichoke and spinach" dips in the world, and you can buy canned artichoke hearts, but my favorite is still the freshly cooked whole artichokes with a big bowl of hollandaise sauce for dipping.  Everything is better with hollandaise sauce.  The first time Miyagi and I made artichokes with hollandaise sauce was on Valentines Day.  It was deliciously romantic.

Whole artichokes are deceptively easy to cook, however another post might be required to describe how to actually EAT them.  Is there artichoke etiquette?  The problem I always used to run into was that I could never tell when they were done, and when you pulled leaves off there were rivers of water running off your elbows.  Puddles in the carpet are certainly NOT a part of artichoke etiquette.  Here's how to avoid them.

Start by rinsing them thoroughly then cutting of the top inch or so of the leaves.  Some people go further and trim all the pointy edges off the leaves but I don't think that's really necessary. Also, if the stems are long go ahead and trim them down too.
Try to make a nice even slice across the top.  The whole point is to make a flat surface so the artichoke can stand upside down.  This is the first step in reducing elbow rivers.

Next, get a pot large enough to fit your artichokes standing on end with a lid.  Fill it with 1-2 inches of water and salt generously.  You can also pepper the water for some extra flavor but be warned that this will result in small black specks lodged deep withing your artichoke that may convince guests that you eat bugs for extra protein.

Get the water up to a boil, set your artichokes in upside down put the lid on and let them simmer for up to 20 minutes.  It's better if the water is just simmering and not at a rolling boil because you're really just steaming these puppies.  Setting them in the pan like this allows the steam to get up to the meat of the leaves and then drain down when it condenses.  Leaving your elbow and carpet dry!  Your guests will be so thankful.

The first time I tried this they only took about 10 minutes to cook.  It really depends on the density of the artichokes it's best just to check on them every few minutes.  After they've gone from bright green to a murky-swampy green try sticking a knife in the stem.  If it slides in easily with little resistance then you know they're done.  If not then slap the lid on and let them stew for a little longer. 

When they're done pull them out with some tongs (you can use your fingers if you want to rid yourself of unsightly finger prints)  and set them upside down on a towel to continue draining.  There's not much left to drain at this point but I'm anal about the river factor and I want my artichokes as dry as they can be.

Then whip up some of this sweet stuff, (recipe to follow) and put it in something more attractive than an old Tupperware container, then figure out how to take better pictures of your food so that hollandaise doesn't end up looking like yellow play dough.  If you're not ready for the glory of hollandaise then melted butter and maybe some lemon juice works great.

I was going to make another batch of artichokes and take pictures of how to eat them . . . but we don't have any eggs.  And artichokes without hollandaise sauce just seems kind of pointless.  Like Sunny without Cher.  (Note: notice you can have Cher without Sunny?  Same goes for hollandaise!) So until we get to the grocery store you'll just have to figure out how to eat them on your own.   Good luck!

Homemade Salsa

I appear to be on something of a salsa kick.  I never used to eat salsa before I met Miyagi . . . or cucumbers.  The thing is I don't really like tomatoes as much as I put up with tomatoes.  So while I loved the flavor, the chunks were always the bane of my existence.  Chunks are hard to ignore.  They're like little battalions, waving their flags and shouting "hey!  Notice me!  Notice the nasty way I feel when you squish me between your teeth!!!"  See?  Gross.

Ahem.  This recipe has no chunks.  Not the way I make it.  I found this over at thepioneerwoman.com but don't look at her version of the recipe . . .her pictures look much better than mine. 

All you need for this recipe is a food processor (in my case a smoothie maker) and a few things to throw in together.

These are good to start with.  1 can of whole tomatoes, juice and all.  Two cans of diced tomatoes and chilies.  (Miyagi didn't know what to get at the store so he brought home something called Mexican salsa . . . is that the same thing?  I don't know.  But it worked great!) 1 whole fresh Jalapeno (seeds and all), chopped, and a bunch of lightly chopped cilantro.  (but not a bunch.  Just a handful or twp.)

Add in about 1/4 cup chopped onion, and a clove of minced garlic. Nothing needs to be chopped too finely because it's all going to get blended together in your blender.  Convenient eh?

Throw this all in your blender and add 1/4 tsp salt, 1/4 tsp sugar, 1/4 tsp cumin and the juice of half a large lime.

Just a word about lemon/lime juice.  Have you ever tasted real lemon juice and then tasted the stuff in the bottle?  It's not pleasant.  It's like liquid tartness without any of the flavor.  Trust me on this, you're life will be happier if you use more real lemon/lime juice.

Do you know what else will make you happier?  Buying one of these little juicer things!  They're like $4 and they get EVERY DROP.  That was always my biggest obstacle to using fresh lemons; I just didn't have the Abductor Pollicis Brevis power. (that's your hand muscle!)  See the how shredded that lime is?  With little to no strength you can happily dredge the fruit of all it's juicy goodness.

Ok.  Back to salsa.  Basically you're adding everything in the blender at once, and praying it fits, then hit pulse a few times to get things mingled.  It doesn't take much.  6 or 7 times was enough to mix everything thoroughly and chop it very fine.  Pulse more if it makes you giggle.  Or less if you like the chunks.  (Savage!)

Also trust that your salsa will look more appetizing than this picture does.  Stupid florescent lighting in the kitchen.

The heat in this turned out to be just right for Miyagi and me, although we occasionally ran into little "pockets" of inferno heat, it was overall quite pleasant. If you want to adjust the heat you can add more jalapeno, or remove the seeds and membranes for less heat.  We also realized that our "Mexican salsa" had heat levels.  We had two labeled "very hot" and two not labeled at all.  We split our chances and put in one of each.  We're risk takers like that.

Oh.  Also?  This makes A LOT of salsa. Be prepared.  For two people in a tiny apartment (I'm not sure how the apartment factors in but it DOES) we almost had too much.  I took a bunch into work the next day and almost a week later we're still working through it.  Did you see that smoothie maker?  This is like 4 large smoothies worth of salsa.

Can you "can" salsa?  Well not YOU specifically, but can it be done without resulting in massive hospital bills?  If so this would totally be worth it.  It takes all of 10 minutes to make and tastes 10 MILLION times better than anything at the store.  I'll have to look into this . . . results to follow!

Homemade Salsa

1 can (28 Ounce) Whole Tomatoes With Juice
2 cans (10 Ounce) diced Tomatoes And Green Chilies (Mexican Salsa?)
¼ cups Chopped Onion
1 clove Garlic, Minced
1 whole Jalapeno, chopped
¼ teaspoons Sugar
¼ teaspoons Salt
¼ teaspoons Ground Cumin
½ cups Cilantro
½ whole Lime Juice

Dump everything in your food processor or blender and pulse until you reach your desired consistency.

Corn and Bean Salsa

Are you:

  • tired of plain old salsa boring you a parties?
  • looking for something quick and easy to impress your friends?
  • wanting a large bowl of something fresh and tasty that you and your husband can eat large quantities of without feeling (too) guilty?

You are?  What a crazy random happenstance!

I first got this recipe from my Aunt Barbara and I've made it about a hundred times since then. Even my non-cooking friends (you know who you are) love making this salsa because it's so good that you want to just eat it with a spoon!  Not that I ever have . . . WHO TOLD?

I'm kind of cheating here because the only real line of instructions on this recipe is "put into a large bowl and mix" but I'm going to stretch this out with pictures and witty commentary.  Ok, MILDLY witty commentary.  Don't get your hopes up.

Here's what we're working with:
1can white beans
1 can black beans
1 tomato, diced
1/2 a purple onion, diced
1 bunch of cilantro, chopped
1 lb bag frozen sweet white corn
1/2 bottle zesty Italian dressing

Start with the white beans and the black beans rinsed and drained.  Note:  White beans ARE NOT the same as white kidney beans.  Just look at the picture on the can.  If they look about the same size as the black beans and smaller than a kidney bean then you're set.

I just work my way through all the ingredients and add them each into a large bowl as I'm working.  The order doesn't really matter and you can adjust the quantities of each depending on your likes.

Next I chopped up a bunch of cilantro.  Like, one WHOLE bunch.  Get it?  Ha.  (Now I can check "mildly witty commentary" off my list.)  You can sprinkle it in delicately like I am in this photo.  Or you can dump in in all at once like I did after this photo.

Here is my purple onion all chopped (or was it diced?) and ready to go in.  This can sometimes overpower the other flavors so don't get too carried away with how much you add because the onion flavor only becomes more powerful over time.  Kind of like Darth Vader.

Here is our lovely tomato before it got hacked to bits.  If you're like me this means itty-bitty teensy-weensy little bits.  Even I can't ignore the positive influence of tomatoes in this dish, and, as long as they're chopped small enough, I don't have to pick around them either.

Don't the onion and the tomato make a cute couple?

If you're going to serve this in a couple hours, dump the bag of frozen corn in the bowl.  It will defrost as it sits.  But if you're like Miyagi and me and want it eat it all now-right-now-I-can't-wait-another-moment-to-put-this-all-in-my-face then you can let the corn sit in a bowl of warm water while getting the other ingredients together.  It only takes a few minutes.  You don't want it hot, just thawed.

This is my favorite dressing to use.  I'm sure there are other kinds out there but they wouldn't be as good and then you would glare at me through the internet for suggesting such a disappointing recipe.

Pour in about half the bottle.  Too much more will leave a big puddle at the bottom of your bowl and will result in more internet-glaring.  I just couldn't bear that.

This is perhaps the most important step: letting your husband snag a taste fresh out of the bowl.  It's just so good he won't be able to wait!  Even the chip is happy in this photo!

We decided to stop resisting and eat most of the bowl for lunch that day (and the rest for dinner . . . shhhhh) but this is also great on taco salad, burritos, fish and whatever else you can think of.

Not brownies though.  This is gross on brownies.

Egg Rolls i.e. Packets of Happiness

For those of you who have never contemplated the joy of homemade egg rolls it's time to man up and contemplate it.  You my think of egg rolls as a nice side or appetizer.  But you would be wrong.  These are the main dish baby.  They are just that good.  Plus once you've succumbed to the egg roll induced trance and devoured 8 or 9 of them you won't have room for anything else anyway.  This is pretty much EXACTLY the recipe on the back of the egg roll wrappers, but we found that using sausage instead of hamburger makes a huge difference and we were just looking for places to pack in the calories.

Start with this:

Contents include:
  • 1 pkg egg roll wrappers (they're not THAT homemade)
  • 1 bag coleslaw mix
  • 1 bag (several handfuls) bean sprouts
  • 1 lb reduced fat ground sausage
  • 2-3 tsp ground/minced ginger (here is looks like mandrake root)
  • 3 green onions, chopped
And possibly the most important ingredient that I forgot to picture is. . .  oyster sauce.  Now I know what you're thinking.  I was an unbeliever like you once.  "Oysters?  Gross!  Oyster SAUCE?  Uber-gross!"  Even people who like oysters still think this.  But they are wrong.  And so are you.  Oyster sauce is the wonderful, magical sauce that turns all Asian recipes into happiness.  You think that soy sauce is the key, but that just tastes salty and weird when cooked.  So once again you're wrong.  You're wrong a lot today, did you notice?

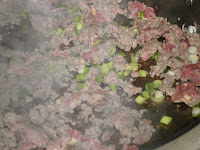
Ok.  First cook up the sausage and ginger in a large skillet.  Trust me when I say large because it gets full later on.  If your skillet isn't big enough to handle all the cabbage/bean sprouts to come you might need to add them in batches.  When your sausage is about half done browning throw in the chopped green onions thusly.

(I apologize I should have waiting to take a picture until the sausage was ALL THE WAY done.  This looks a little gross and a lot unappetizing.)

When this is all done drain out the extra fat, (with the reduced fat stuff there's not anything to drain), and turn off the heat.  Then add in the whole bag of cabbage, and the whole bag of bean sprouts.  Then top it off with 3-4 generous Tbs of oyster sauce.  (I know it looks like octopus ink in this picture but it's really quite tasty.  It doesn't taste like oysters at all.)

Mix it all up good and let it rest and cool a bit while you set up your wrapping workspace.

You will need some space to roll up the egg rolls, somewhere to stack them, and a small cup of water.  If you have someone helping you this is probably a good time to start heating up your frying oil as well.  If you're flying solo don't try to do it all at once.  Just roll them all, then you can focus on frying without fear of 2nd degree burns.  Again, these rolling instructions are on the back of the egg roll package but here's some pictures to help you visualize.

Start with one egg roll wrapper laid at an angle (like a diamond) and spoon about 3Tbs of your egg roll mixture in the middle.  NOTE: I was taking these pictures at an angle while Miyagi rolled them up so the viewpoint is a little skewed.  Imagine you're standing slightly to the left of this and you'll get the gist.


Next fold up the bottom corner and tuck it in a little to make a nice little log shape.


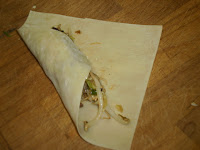
Then fold in the sides like a burrito.


Then dab your finger in the water, swipe it over the top corner, and roll it all the way up to seal it.


Sometimes the bottoms get a little moist so if you're having trouble with the wrappers tearing when you pick up the egg roll try keeping them on parchment paper and handle them gently to avoid this.  Once you have a few done you can start frying, are cool like me (and a little white trash) then you have your own Fry Daddy and frying is fast and clean!  However if not you can heat up some vegetable oil in a large pot.  You only need about 2-3in of oil but a larger pot keeps the oil from spitting out everywhere.  Dump these in 350° oil and let them cook for about 3-4 minutes until they golden brown like this.


Then spoon them out and put them on some paper towel to cool.  Tongs are really good for this step.  If your egg rolls are greasy it means that your oil isn't hot enough.  They should look dry within about 30 seconds of removing them from the oil.

My biggest trouble is that I can't turn them over in the fryer without them flipping right back up.  Generally I take the frying spoon and balance it on the edge in such a way that it completely submerges the egg rolls in the oil.  This is dangerous and impractical and I advise all to avoid this method whenever possible.

Cook a bunch more and your tray will look like this:

Don't even bother artistically arranging them on a nice plate.  Just get some soy sauce and chomp them down as quickly as possible.  BEWARE.  They stay VERY hot for several minutes after frying so remember which ones you fried first so you can start by eating those.  This will guarantee the optimum egg roll trance experience.

Lastly, these are good reheated . . . but they're not great.  Maybe reheated in a toaster oven wouldn't be bad . . .  This time we rolled them all up, but only fried about half and froze the rest.  Hopefully they'll fry up fine later and be as tasty as the fresh ones.

Site Meter